|
MercuryDPM
Beta
|
|
MercuryDPM
Beta
|
This page contains the following tutorials:
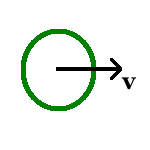
File Tutorial1.cpp is setup to simulate a particle moving with a constant velocity in the absence of gravity, i.e. \( g= 0 m/s^2\). Below we describe each bit of the T1.cpp in detail.
To setup this problem code, below are the necessary headers (from the kernel) and the standard libraries, we include in Tutorial1.cpp.
Details concerning the above included headers (from the kernel) can be found in
A class named Tutorial1 inherits from Mercury3D and is defined as below
The below function creates and sets up the problems’ initial conditions
A particle is created and copied in a manner shown below
p0 is an instance of the class BaseParticle and its properties like radius, initial position and velocity are set as above. The bit
creates the particle p0 and adds a copy of it needed for the simulation.
In the main function, # Problem properties, such as gravity, spatial dimensions (x,y,z), total run time are set as below
# A particle can be of any type. There exist a variety of particle types, e.g. glass, plastic etc. Each of them behave differently when in action. Initially, when a particle is created, it attains the properties of a default species type with ‘0’ as its index. However, one can changes the species properties, as below.
# Data output is vital to analyse simulations, which leads to defining ways to save the simulation data for post processing.
The simulations generate several types of data files. See Understanding the Output Files.
Below we set the flags corresponding to each data file type.
# For XBalls users, additional display options can be set as below
# After all the simulation parameters are set, we reach a point where we put all the above bits of code in action by the following statements
To see the above snippets as a whole, goto Particle motion in outer space (code)
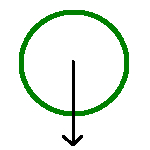
In Tutorial2.cpp, we simulate a particle when dropped under the influence of gravity, \( g = 9.81 m/s^2\). Basically this is an extension of T1.cpp with few minor changes. All we need to do is change the following
To see the whole code with the above snippets included, goto Particle motion on earth (code)
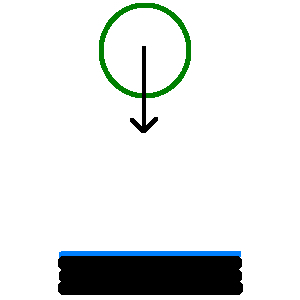
In Tutorial3.cpp, we simulate a particle bouncing off a wall assuming the collision between the particle and the wall is elastic. By elastic we mean that the particle velocity before and after collision remains the same. Implying that the restitution coefficient is unity. Additionally, we will learn how to add a wall over which the ball bounces.
In order to add a wall to our problem setup we need to consider including the header
The above class is basically an extension when compared to Class Tutorial1 or Class Tutorial2. Only difference being the addition of the wall which is done as shown in the snippet below
The above set of statements, create and place the wall at \( Z_{min} \).
Note: Don’t forget to include the InfiniteWall.h header, as shown in the header section. In some sense, creation and addition of a wall is similar to creation and addition of a particle.
As usual, the problem is setup in the main function, see Bouncing ball - elastic (code).
In Tutorial4.cpp, the difference between an elastic and inelastic collision between a particle and a wall is illustrated. The only difference between T3.cpp and T4.cpp is the value of the restitution coefficient. In T4.cpp, the coefficient of restitution is set to
See Bouncing ball - inelastic (code) for more details.
So far, in the above tutorials, we have seen how a particle and a wall interact during a collision.
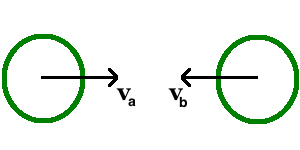
In this tutorial, we illustrate how two particles interact using Tutorial5.cpp. For this purpose, we need two particles.
The particles may or may not be of the same species type. But, here we shall assume they are of same species and same size.
As usual, we begin with including the required headers
On comparison between the above class and Class Tutorial1, we see how an additional particle is added. In the above class, in function
two particles are created, and positioned oppositely apart at a certain distance between them. Both the particles, have a certain velocity directing them towards each other.
Similar to Tutorial1.cpp, the problem is setup in Elastic collision - 2 particles (code)
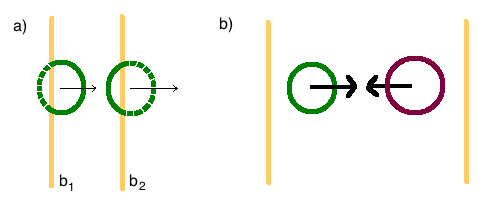
In the previous tutorial, we illustrated elastic collision between two particles of same type and size traveling towards each other.
In order to have multiple collisions, in the problem setup as Tutorial 5, we will use periodic boundaries in X.
Above are the headers necessary for this problem.
In the Class Tutorial6
(i) we create two particles of same type and different sizes.
(ii) we setup periodic boundaries in X-direction as
Note:
To create periodic boundaries one has to include the header ‘Boundaries/PeriodicBoundary.h’.
Be aware that the periodic boundary is not the same as an infinite wall.
Similar to Tutorial5.cpp, the problem is setup to solve, see Elastic collisions with periodic boundaries (code)
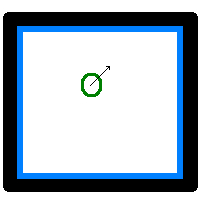
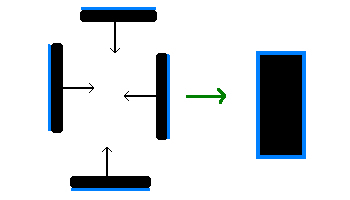
In previous tutorials, we have seen how a particle interacts with a wall and itself. In this tutorial, we will learn to design boxes of different shapes by using more than one wall. As an example, in absence of gravity, we will simulate a particle moving in a two dimensional square shaped box. We consider two dimensions only for the sake of simplicity.
In Tutorial 3, we have shown you how to setup a wall. This tutorial builds itself on the same idea i.e. setting up walls.
We use the same headers as used in Tutorial 3.
In this class, we setup a 2D square shaped box or a polygon by adding more walls as shown above. In total, we have 4 walls forming our box within which the particle will traverse.
Note: As we simulate in 2D, no walls are set in z-direction.
As our simulation is two dimensional, we set the system dimensions as 2
Complete code for the above problem description can be found in Motion of a particle in a two dimensional box (code)
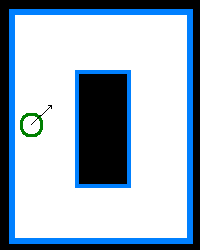
We extend the problem setup of Tutorial 7, by adding a rectangular block as shown in the above figure. To create this block of wall or obstacle, we will use the Class FiniteWall. Before we go ahead it is advised to know the difference between an infinite wall and finite wall, see Different types of walls. As an example, we create an obstacle using a set of finite walls and place it within the box created using a set of infinite walls. See the above figure.
The class Tutorial7 from the previous tutorial is extended by adding the finite wall setup. See the below snippet.
Similar to Tutorial 7, the above described problem is setup in Motion of a particle in a box with an obstacle (code)
 1.8.7
1.8.7 
